Feeds:
Posts
Comments

Posts Tagged ‘Daler Rowney’

Welcome Back

Inspired by Flora Chang’s doodle in Craft-a-doodle book I drew this for Valentines Day. Turns out I really like this folk arty style, who knew hehe. Just goes to show, it’s always worth exploring new areas with your art and creativity, you never know where it will lead you.

Valentine's Doodle

Valentine’s Doodle

This was created using

  • Faber Castell Pitt Artist Pens
  • Faber-Castell PolyChromos pencils.
  • Daler Rowney Basic sketchbook

Some interesting points came up during these doodle experiments, apart from try what you have in your stash before buying new stuff. I had in my stash some Polychromos pencils that a dear friend gave me some years back when they were all the rage for using with a solvent for coloring in. Nice as they were, at the time I didn’t enjoy the overly waxy finish and glossy result they gave when you layered colours. However, I tried them again with the Daler Rowney sketchbook, which has a little more tooth than cartridge paper and this time enjoyed their almost crayon like result.

Using Polychromos pencils almost feels like colouring with Galaxy chocolate. They are super smooth and silky but they do have a high wax content so unless you have them super sharp they can look like wax crayon. Although I find this difficult for sketch work, for doodling and more folk arty projects they are great. Amazon had a set of 36 in their sales at Christmas so now I’d fallen in love with them I treated myself to a set to increase my colour options. If you haven’t tried them before, I’d highly recommend you get a two or three of the individual pencils and try them on your favorite drawing surfaces and see if you enjoy them before purchasing bigger sets. It took me a while but now I appreciate their texture. Just depends on you style and skill level I guess. They do need more work to blend than other pencils, which I struggled with, thanks to poor dexterity so for me they don’t win over my Inktense for sketching and more realistic style of art.

Moral of the tale, if you have art materials that you don’t think you like, try them for a different style of art or on different surfaces. Some things just have a learning curve and it’s getting to know how to charm your materials to get the best from them. Check out Pintrest and the like to see how others use them and then look for tutorials. It could be down to learning the right techniques.

Have fun experimenting, and your sketch book is a great place to try out new materials and new ideas.

Links

To find the supplies used in this doodle, check out my Art Supplies page.

Review of Inktense Pencils

There will be a review of the Polychromos pencils coming soon to this blog 🙂

Best wishes and thanks for reading, see you soon

Billie 🙂

Read Full Post »

Welcome Back

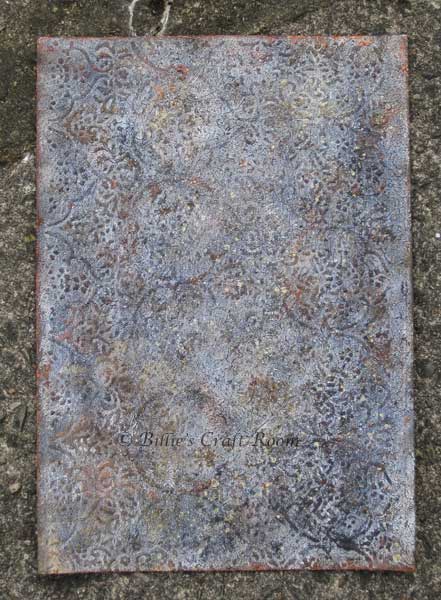
Texture paste is a fantastic way to add texture and dimension to art projects. Today’s tutorial will combine a variety of textures and colours in a simple but effective way to create a stone like effect. A great way to try texture paste for the first time.

You Will Need

  • Daler Rowney: Texture Paste
  • Embossed cardstock (I used 300 gsm card embossed in a Cuttlebug with my favorite folder)
  • Jar of water
  • Rag
  • Sponge
  • Royal Langnickel: K4 Palette knife
  • Heavy weight cardstock
  • Mount board or chip board
  • Palette
  • Winsor & Newton: Galleria Acrylic Paint; Paynes Grey, Burnt Sienna, Raw Umber

Method

  • You will need a piece of dark embossed cardstock. I used a piece of 300 gsm card, which I embossed using a Cuttlebug die cutting machine and my favorite embossing folder. You could also use textured wall paper if you wish. (see my other videos for how to emboss cardstock. I’ll add link at the end).
  • Apply a layer of texture paste over the whole of the embossed surface of the card. You don’t need too heavy an application, you still want to be able to see the embossing through it.
  • While the paste is still wet, apply bubble wrap over the card stock and pull it up off the piece, this adds light texture. For a less uniform pattern, you could also use plastic bag to dab on to the surface.
  • Allow the paste to dry overnight. Drying time may be faster if you have a thin application or are in a warm climate. Do not force the paste dry with a heat gun. (Oh ok, just a little but only if you have a gentle one and DON’T over heat it.)
  • Apply paynes grey gently over the high areas of the embossing, this will bring out the pattern and also the texture.
  • Allow each colour to dry before you add the next or they will blend rather than layer
  • In a few places add some Burnt Sienna
  • In a few places add some Raw umber, this is also useful to tone down any overly bright areas.

When you are happy with the look, allow all the layers to dry fully and then glue the finished piece onto sturdy card such as mount board or chip board.

Options/Added Extras

For a more distressed darker look, add extra Raw Umber around the edges of the board.

If you find it gets out of control and you have heavier applications of colours that you don’t like (yes this happened to me! when I tried this on a larger piece). Water down your Paynes Grey on the palette and apply a light colour wash over the piece. Dab into it using the rag, to vary the depth of tone.

Here’s what that does to your piece.

Grunged version of embossed stone

Grunged version of embossed stone

Experiment with different tools to apply your texture paste and different mark making items to vary the textures you get. It’s so much fun to put a layer down and see what you can do with it. The texture paste is quite forgiving as long as you put it onto a sturdy surface. Use it on mountboard to have more ‘fiddle’ time, without the tearing the card apart. I do sometimes experiment till a card gives up (not always intentionally) but that’s a great way to learn.

Here’s the book I made with my panel to store my sketches in.

Embossed stone book

Embossed stone book

Have fun experimenting and I’d love to see what you create with texture paste, do leave me a comment and show me what you have made.

Links

Best wishes and thanks for reading see you soon

Billie 🙂

Adventures in Acrylics: Online workshop

Adventures in Acrylics: Online workshop

Read Full Post »

Welcome Back

In today’s post I will be reviewing; Daler Rowney Texture Paste.

Daler Rowney; Texture Paste

Daler Rowney; Texture Paste

Product Details

  • Manufacturer/Brand; Daler Rowney/ Cryla
  • Item number: 128250017
  • RRP at time of writing: £7.50 from SAA

Purpose

‘Quote from Daler Rowney Packaging’

  • Builds heavy layers of texture in fine art and craft work
  • Directions: Apply with a knife, stick or stout brush to any grease free rigid surface. Including wood stone unglazed ceramic, MDF and cardboard or shape with modelling tools. On flexible surfaces eg stretched canvas, use up to 1/1 with Daler Rowney Impasto gel matt medium.
  • Drying times vary according to conditions. Fill any cracks in very thick applications with more texture paste or Daler Rowney Impasto Matt medium. Sand, carve  and over paint with acrylic colours as required.
  • Suitable for acrylic painting.

Reason For Buying

I had ideas for dimensional projects using modeling paste-but that dries slightly soft. When I saw this demonstrated on Creat and Craft, I pounced on it, as this does the kinds of things I wanted to do. It also looked like it dried much harder.

Pros/Cons

  • Can be used alone for a white finish
  • Builds textures and dimension. Great for faux stone like finishes
  • Mixes with colours for a coloured ground
  • Dries overnight
  • From the jar it is white, so ideal to paint over
  • Stamp into it while it’s still damp for debossed effects
  • Easy to clean tools in water, clean immediately so the paste doesn’t dry on your tools
  • No smell, other dimensional products have had harsh ammonia smell, but there is no smell with this product YEY!!!!
  • Use with stencils and over textured paper for effects

Cons

Haven’t got any, its done all I asked of it and more

Build Quality

Excellent, It really holds shapes you press into it or create with it and mixed with colour or over painted performs superbly.

Value for Money

Just the beginning, a few samples made after only an afternoon with texture paste!

Just the beginning, a few samples made after only an afternoon with texture paste!

Texture paste is excellent value for money, it is such a versatile exciting product. These are samples from just two afternoons playing with texture paste for the first time. Tutorials are planned  😉

Would I buy it Again?

Totally! LOVE love this product, every time I use it I find a new technique.

Summing up

Lovely stone like texture, created with texture paste

Lovely stone like texture, created with texture paste

Very versatile product. Alters how paint behaves when mixed with colour. Great for adding textures and dimension to your creative projects. If you haven’t tried it yet but like dimensional effects and textures, get some, its fantastic. Because of the weight the product adds to the surface, it is best to use it on a firm support. I’ve used it mainly on Mount board, but have got away with using it on something lighter; 300 gsm, but I’m still going to mount that onto mount board for better support.

I adore textures and look forward to experimenting with a variety of tools with this paste to see if I can recreate my favorite textures in paint. If you have masks and embossing folders experiment with cardstock and paste combinations. I have now been able to use my collection of brass stencils that I haven’t had the dexterity to use before.

Really enjoying this product, its exciting and so much fun. Hope you get some soon and will share how you use this excellent product. I’ll experiment and see if painting over it will give me a good enough black, otherwise I’ll beg D.R  to make a black version of the product, as this is going to be FANTASTIC with those interference/shimmering colours they make.

Short version: Joy in a Jar! 🙂 🙂 🙂

Links

Best wishes and thanks for reading, see you soon

Billie 🙂

Adventures in Acrylics: Online workshop

Adventures in Acrylics: Online workshop

Read Full Post »

Welcome Back

It took me a long time to try gesso, then I had no idea what to do with it. In this tutorial I’ll show you a few ways to apply it.

Daler Rowney: Gesso; White

Daler Rowney: Gesso; White

You Will Need

  • Tub of gesso
  • Jar of water
  • Rag
  • Palette knife
  • Car sponge
  • Brush
  • mountboard
  • palette to mix on
  • craft sheet

Method

Sponge

The simplest way I’ve found to apply gesso to small projects and intricate shapes is with a sponge. Pour some gesso into a bottle top. Dab a sponge into the gesso and swipe it onto your chosen surface. It dries faster if you apply a couple of thin coats rather than go for a thick coat right away. Leave to dry, how long it takes to dry depends on your room temperature and humidity.

Palette knife

Scoop up gesso and spread it onto your project. Repeated thin coats allowed to dry will dry faster than one thick application.

Brush

Apply as you did with the knife.

Don’t let gesso or any acrylic dry on your tools, if you can’t clean them immediately, place them in water. Once you have finished using them, use soap and cold water to clean off the gesso.

Options/Added Extras

Experiment with different surfaces to apply your gesso to, and different tools to apply the gesso with.

Links

Best wishes and thanks for reading see you soon

Billie 🙂

Adventures in Acrylics: Online workshop

Adventures in Acrylics: Online workshop

Read Full Post »

Welcome Back

In today’s post I will be reviewing; Daler Rowney Gesso

Daler Rowney: Gesso; White

Daler Rowney: Gesso; White

Product Details

  • Manufacturer/Brand; Daler Rowney/ Cryla
  • Item number: 128250006
  • RRP at time of writing:

Reason For Buying

I wanted to strengthen pages of a sketchbook so I could use it with acrylic paint. Also to cover over grey board/mount board and paper mache boxes for dimensional projects.

Pros/Cons

Pros

  • Opaque
  • Great Coverage
  • Can add acrylic paint for a coloured base
  • Great for collage

Cons

Not got any really. Just be aware that gesso in general does add a tooth or key to the surface. Which can make your paint and tools drag a bit over the surface. I save an old brush or use a sponge to apply gesso, to avoid wearing out my favorite brushes.

Build Quality

Excellent, great fitting lid to the pot. You can squeze small amounts out using the nozzle in the lid or unscrew the lid if you want to use a palette knife.

Value for Money

Great. I’ve had mine ages and it’s still fine.

Would I buy it Again?

Yes. I love this gesso. It covers well and didn’t dry out in the pot, despite over a year of neglect. Worth the price for a quality product.

Summing up

Great for applying a less absorbent base for acrylic paint, I’ve used it on journal pages to give the paper more weight. On paper mache boxes to cover the board. Add acrylic paint to white gesso for a coloured base. A very versatile product, I’ll show some techniques using it in the coming weeks. If you haven’t yet, do try some gesso, it’s very useful and can be a fun way to experiment with more surfaces to paint onto.

Links

Best wishes and thanks for reading, see you soon

Billie 🙂
Adventures in Acrylics: Online workshop

Adventures in Acrylics: Online workshop

Read Full Post »

Welcome Back

This is a technique that I discovered by accident when playing experimenting with my new Interference acrylic colours. This paint works best over dark colours so I created a dark background and was layering the interference colour and really liked the effect. With a little practice you can make it look like brushed metal.

Brushed Metal Paint effect, perfect for art journalling and surface decoration

Brushed Metal Paint effect, perfect for art journaling and surface decoration

You Will Need

  • Winsor & Newton Galeria Acrylic Paint: Burnt Umber, Burnt Sienna
  • Daler Rowney Interference acrylic colour; Shimmering Gold
  • White Mount board
  • Plate to mix colours on
  • Two scraps of rag
  • Palette knife
  • Jar of water

Method

  • Use the palette knife to apply a layer of Burnt Umber over the whole mount board panel, allow this layer to dry.
  • With a rag apply interference gold in ‘grain direction’ as seen in the video and previously in the weathered wood tutorial. Allow this layer to dry.
  • With a rag, apply some Burnt Sienna in ‘grain direction’ like you did with the gold. Burnt sienna is semi transparent and will let earlier layers show through but this will warm the colours up and tone down any areas that are looking too bright. Allow this layer to dry.
  • Continue to build your layer till you have an effect that you like, if you like a darker tone go back in with some Burnt Umber with the rag to deepen some areas or perhaps create a frame to the piece.

Like with the other techniques, to get the best results it’s all about the blending. Build up the layers gradually for the best results and allow each layer to dry before you apply the next.

Options/Added Extras

Winsor & Newton Galeria is a flow formula acrylic paint, so the finished result will be flat. This makes it ideal for art journals, ATC and pieces you wish to write or stamp over. If you want a more dimensional effect use a heavy bodied acrylic paint such as Daler Rowney Cryla which will add more dimension to the piece.

Experiment with different base colours and mixes for other effects.

Links

Hope you have enjoyed the video and will give the technique a try, do let me know how you get on. I’d love to see what you create using this technique.

Best wishes and thanks for reading see you soon

Billie 🙂

Adventures in Acrylics: Online workshop

Adventures in Acrylics: Online workshop

Read Full Post »

Welcome Back

Earlier this month I introduced you to Daler Rowney’s Interference colour acrylic paint. I’m still in love with this and wanted to share a few more pictures of projects I’ve created using the paint.

A selection of handmade books with Shimmering colours on the covers

A selection of handmade books with Shimmering colours on the covers

The interference colours are most impressive when used over dark colours, so these books feature black card that I embossed and then used a selection of the shimmering colours over the top. They are tricky to photograph and really pop when you see them in real life, the colours reflect the light so are even more dramatic than metallic colours. Do try some if you can, they are amazing.

Here is a close up on the textile book;

Embossed book with multi colours of interference acrylic paint

Embossed book with multi colours of interference acrylic paint

So glad I learnt some bookbinding skills, I couldn’t bear to cover up these backgrounds so used them for covers for my hand-made note books. Will be making some more of these as little Christmas gifts for friends later in the year.

Hope you like them and get to try some interference colours soon.

Best wishes and thanks for reading, see you soon

Billie 🙂

Read Full Post »

Older Posts »